Spring 1012: The Battle of Barzak Vale
Duke Grimoald of Oberlichenwald in Valgasmaa lead an army of 7250 men on a raid against Mt Hofburg, the capital of the Szepetnek Mountains. Serogn, the Goblin King of the Szepetnek Mountains, assembled an army of 11,800 warriors and offered battle to the invaders in Barzak Vale, just south of Mt Hofburg.
| The Goblin Army | Valgasmaa Army |
| 5 | Archers | Foot Skirmish | | 2 | Knights - Elite, Shock | Mounted Melee |
| 8 | Goblins | Foot Melee | | 3 | Archers | Foot Skirmish |
| 1 | Ogres | Foot Melee | | 3 | Infantry | Foot Melee |
| 2 | Wolf Riders | Mounted Skirmish | | 2 | Mercenary Arquebusiers | Foot Missile |
| 2 | Black Moon Goblins | Foot Melee | | 1 | Mercenary Pike | Foot Melee |
| | | | 2 | Mercenary Light Horse | Mounted Skirmish |
On the grassy plain at the northern end of the Vale, Serogn deployed his wolf riders in a column at the right of his line. He then deployed his Goblins in a double column, with his archers in a line parallel with the head of the column. Behind the archers, he stationed his Ogres, while his Black Moon Goblins were stationed in reserve, parallel with the rear of the Goblin column.
 |
| Barzak Vale - the armies deploy |
Over the central hill, across the southern end of the Vale, Duke Grimoald drew up his army. His Light Horse formed his left wing while two units of archers formed his skirmish line. Behind them, Grimoald formed up his two units of knights in front of a pike unit and three units of Men-at-Arms. On his right flank, Duke Grimoald placed another unit of archers and two units of Arquebusiers.
 |
| The right of the Goblin Line |
 |
| The left of the Goblin Line |
 |
| The Valgasmaani deployment |
 |
| The main Valgasmaani battleline |
 |
| The Valgasmaani right flank |
Hesitantly (as, after deployment, I realized that with a WR of 2, Grimoald could only activate two groups per turn), Duke Grimoald pushed forward the Light Horse on his left flank, and the Archers and Arquebusiers on his right, while refusing his center. Over the hill, King Serogn dispatched his wolf riders against the Light Horse while ordering his mass column of foot to advance. The faster moving Archers, with the Ogres in support, pulled ahead and gained the crest of the ridge, while King Serogn remained to the rear with his two units of Black Moon Goblins.
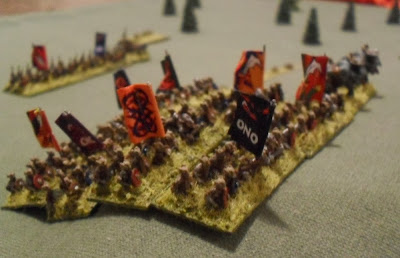 |
| The Goblin battle line crests the ridge |
 |
| The Wolf Riders battle the Light Horse |
On Duke Gimoald's left flank, the Mercenary Light Horse was soon engaged with the Wolf Riders. After a short action, one unit of Wolf Riders fled the field while the other retired to the very margin, where it waited the result of the battle.
 |
Midway through the battle, the Knights are not making headway in the center
while the Valgasmaa skirmishers and Light Horse are having success on the flanks |
On Duke Grimoald's right flank, the Archers and Arquebusiers soon caused the Goblin Archers to retire in confusion. He had halted the Archers covering his front and moved his battle line closer to the hill, even as the Goblin column crested it, halted, and began to expand into line. Grimoald ordered his Light Horse to harass the end of the Goblin line, even as his Knights moved up to attack the Ogres on the hill.
As King Serogn moved his Black Moon Goblins up to fill the gap on the Goblin left, the Valgasmaani Knights charged home. Both the Ogres and the Black Moon Goblins held the charge of the Knights and threw them back. It was here that Duke Grimoald discovered that his line of infantry were too close behind the Knights.
 |
| The Goblins begin to push down the southern slope of the hill |
Again and again, the Knights charged desperately up the hill against the Ogres and Black Moon Goblins and, again and again, they were thrown back. King Serogn in his chariot led the Black Moon Goblins to first hold, and then to advance against the Knights.
On the Goblin right, the lead units of the great Goblin column charged down the hill, dispersing the Light Horse and sweeping away the Valgasmaani Men-at-Arms unit on the left of the Human battle line. In desperation, Duke Grimoald about faced the rest of his foot and marched them back to give room to the Knights struggling on the lower slopes of the hill. The careful withdrawal quickly became a rout as the Knights, exhausted from the battle on the ridge, broke and ran.
Seeing that the battle was lost, Duke Grimoald quit the field. Two units of Archers were lost in the rout but the rest of the army eventually reassembled at Oberlichenwald a couple of days later.
Well, that was a fun battle. I'm pretty sure I got some rules wrong, and the
Retire rule caught me out with Duke Grimoald's deployment. As Grimoald has a WR of 2, I am assuming that what he lacked in experience, he attempted to make up for in enthusiasm.
King Serogn was in a tight spot. With two invasions, he had to decide whether to split his army and attempt two battles (and risk defeat in detail), or concede a province, risk unrest, but concentrate on beating his toughest foe first. Having beaten back the Valgasmaani, his gamble may have paid off as Kypselos' Beastmen have fielded a smaller force - though they do have a mage.
The Goblin figures in this battle are by Baccus 6mm while the Ogres and Lesser Goblin Archers are by Irregular Miniatures. All the Human figures are from Irregular Miniatures
Men of the West range.


No comments:
Post a Comment